
A foundation crack repair kit is a small, specific tool. It seals a clean, non-structural vertical crack of roughly 1/16 – 1/4 inch in a poured concrete wall, it costs $70 – $150, and on that crack it holds for the life of the wall. Every other outcome people report with these kits traces back to using one on a crack it was never designed for. So the choosing happens at the wall, with a flashlight and a ruler, before it happens on a product page.
What actually decides this purchase
Four specifications separate a kit that works from a kit that sits half-used on a shelf. None of them is brand.
Polyurethane or epoxy
Polyurethane expands and stays flexible — the choice for stopping water. Epoxy is structural adhesive and cures rigid, appropriate only where an engineer wants the wall to carry load across the crack again.
Read the goal before the label. If water comes through after heavy rain and the wall is otherwise sound, polyurethane is the answer and epoxy is the expensive detour. If a structural engineer has written a repair specification, that document names the chemistry and you follow it. A polyurethane kit runs $70 – $150 and an epoxy kit $80 – $170, so price almost never decides this.
Crack width it can handle
Most kits work on 1/16–1/4 inch cracks in poured concrete. Genuinely hairline cracks are often too tight to accept resin — a common source of DIY frustration.
Measure with a ruler or a crack comparator card before you order. Below roughly 1/16 inch the crack is often too tight for resin to travel into, and you end up with a bead of material sitting on the surface doing nothing useful. Above 1/4 inch you are outside the design range of a consumer kit and into the territory where somebody should establish why the crack opened that far.
Coverage per kit
Typically about 10 linear feet. Measure your crack before ordering rather than after.
Run a tape measure along the whole length, including the section hidden behind the furnace or the shelving you have to move. Two kits at $140 – $300 still sit far below a professional visit, and running dry mid-injection leaves the part you already opened cured half-filled. Order the second kit up front and return it unopened if the first one covers the run.
Poured concrete only
Injection assumes a solid wall with a discrete crack. Concrete block has hollow cores that swallow the material, so these kits do not work on block walls.
Look at the wall to tell which you have. Poured concrete is one continuous surface, usually with form-tie marks in a rough grid. Block shows a repeating rectangular pattern of mortar joints. The tell during injection is resin that vanishes into the wall and never appears at the next port — that is the hollow core swallowing it. Block walls get surface sealing plus exterior water management, or structural reinforcement where the joints are moving.
When the right purchase is nothing
A dry hairline vertical crack that is not growing needs a pencil mark and a date, not a kit. Most poured foundations develop one or two of these in the first few years as the concrete cures and shrinks. A crack that has held still through a full wet season and a full dry season is dormant, and sealing a dormant dry crack changes nothing about your house except its appearance.
If you want a number rather than a pencil line, a crack monitoring gauge at $10 – $25 is the smarter first purchase. It sticks across the crack and reads movement in two axes, so after three months you know whether you are looking at a dormant shrinkage crack or something with a cause behind it. That single reading decides whether you spend $15 more or $5,000 more, which makes it the highest-value item on this page by a wide margin.
There is also a set of cracks where sealing is the wrong first move entirely. A crack that runs horizontally, steps diagonally through block mortar joints, sits wider at one end than the other, or leaves one face proud of the other is reporting movement in the wall. So is a crack that has measurably grown over two or three months. In those cases the sequence is a structural engineer at $450 – $600 first, a repair scope second, and sealant somewhere near the end. Injecting resin into a moving crack produces a tidy wall for a season and a second crack beside the repair after that.
Options by use case
As an Amazon Associate we earn from qualifying purchases. It doesn’t change your price, and we don’t rank by commission. How we make money
Polyurethane injection kit
- ~10 ft coverage
- Surface ports included
- Sets in damp cracks
The right default for water. Will not set against actively flowing water. We link the category on purpose: proper port-and-resin kits are a contractor-supply item, and much of what turns up under this search is surface sealant instead.
Check current price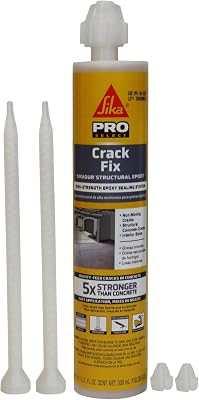
Sika Sikadur Crack Fix
- 10.1 fl oz self-mixing cartridge
- Low-viscosity, deep-penetrating epoxy
- Non-shrink, cures rigid
- Uses a standard caulk gun
Wrong choice on a crack that is still moving — it will crack again beside the repair.
Check current priceHydraulic cement patch
- Sets in minutes
- Surface application
Surface-only. It does not penetrate and does not waterproof under pressure. Category link — pack sizes swing from 2 lb to 50 lb, so buy to your crack, not to a model name.
Check current price
Avongard Displacement Tell-Tale Crack Monitor
- Tracks horizontal and out-of-plane movement
- Range −10 mm to +50 mm horizontal
- Calibrated plate in millimetres
- Screw or adhesive mount
The cheapest useful item on this page. A crack that is still moving needs diagnosis, not sealant.
Check current priceHow to actually inject a crack
Plan on an afternoon for a single crack, plus overnight curing before you can call it finished. Ventilate the space, wear eye protection and nitrile gloves, and read the temperature range on the resin — most kits want the wall above about 40°F to cure properly.
- Clean the crack. Wire-brush the face and remove loose concrete, paint, efflorescence and any old filler. Injection resin bonds to concrete and slides off debris, so this step does more for the result than the brand of kit does.
- Mount the surface ports. Set ports every 6 – 8 inches along the crack, glued in place with the paste supplied. Centre each one over the crack line so resin enters the crack rather than the wall face.
- Paste-seal the face. Spread the sealing paste over the crack between the ports, roughly an inch wide, and let it cure fully — commonly a few hours. This is the dam that forces resin into the wall instead of out of it, and rushing it is the most common reason a first attempt leaks paste everywhere.
- Inject bottom to top. Fill the lowest port until resin appears at the next port up, cap the one you just filled, and move up. That order pushes air ahead of the resin rather than trapping it in a pocket you will never reach again.
- Cure, then remove the ports. Give it the full cure time on the label, snap the ports off, and grind the surface paste flush if you want the repair invisible.
One diagnostic worth watching for: if resin keeps disappearing into the wall and never appears at the next port, stop injecting. You are filling a void behind the wall rather than the crack itself, and continuing simply empties an expensive cartridge into the soil.
Where these kits genuinely fail
Three failure modes account for nearly all of the frustration with DIY injection, and all three are predictable before you open the box.
Genuinely hairline cracks are often too tight to accept resin. A crack you can barely see with a flashlight has less internal volume than the applicator can push material into. The resin backs up at the port and cures on the face. If the crack is that tight and it is dry, that is also the crack that most likely needs nothing.
Nothing sets against actively flowing water. Polyurethane tolerates a damp crack and will cure in one, which is exactly why it is the waterproofing default. A crack with water running out of it under pressure is a different situation: the stream carries the resin away before it gels. Water arriving under that kind of head usually means a drainage or hydrostatic pressure problem outside the wall, and that is where the money should go first.
Injection does not work on concrete block. The method assumes a solid wall with one discrete crack running through it. A block wall is a grid of hollow cores and mortar joints, so injected material spreads into the cavities and the crack itself stays open. Stair-step cracking through block joints is also the pattern that most often signals soil pressure or differential settlement, so it deserves a diagnosis rather than a cartridge.
DIY kit versus professional injection
Professional polyurethane injection runs $350 – $900 per crack installed, and epoxy injection $400 – $950. A DIY kit covering the same crack is $60 – $150. On a crack that fits the specifications above, doing it yourself saves roughly $300 – $750 and takes an afternoon of unglamorous work in a basement.
The case for paying a contractor is narrower than their marketing suggests, but it is real. Professional work comes with a warranty, which matters when the crack is in a finished basement where a failed repair means replacing drywall and flooring as well as redoing the seal. Injection under higher pressure also reaches through a thicker wall more reliably than a hand applicator does. And where the crack is one item on a longer list — several cracks, a bowing section, water at the floor-wall joint — one contractor visit covering all of it beats four separate afternoons.
For anything structural, treat the repair cost as the second number and the diagnosis as the first. An engineer at $450 – $600 writes a scope you can hand to three contractors, which routinely changes the bids by more than the engineer costs.
- Foundation crack repair — every repair method and when each applies
- Foundation crack repair cost — professional pricing by crack type
- Types of foundation cracks — identify what you are looking at
- Hairline crack in a foundation — the case for monitoring instead of sealing
- Signs of foundation problems — the walk-around that tells you whether this is structural